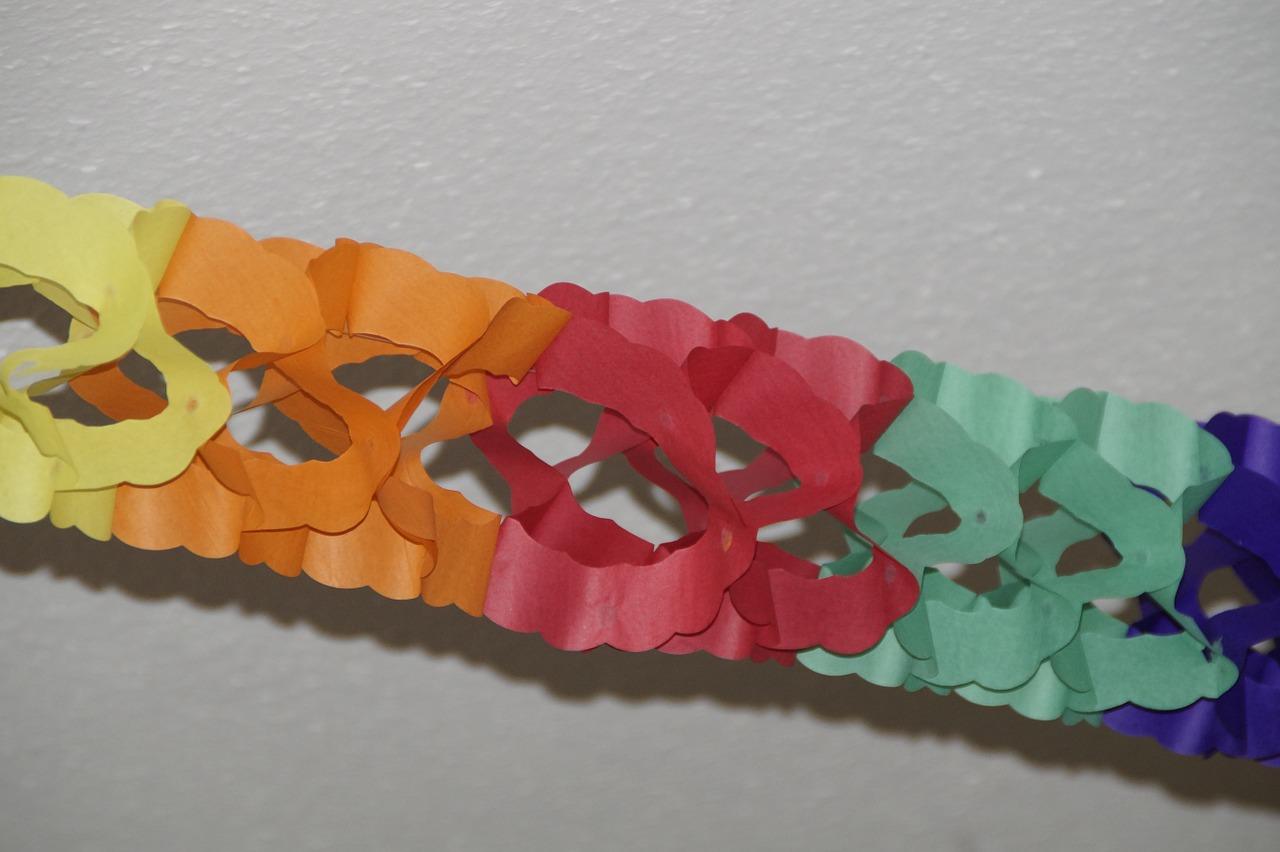
Each family decided to decorate the house for the holidays. Some use purchased jewelry, while others use paper garlands made with their own hands. If you do not want to spend money on jewelry, read the instructions on how to make a garland of paper with your own hands at home.
I recommend that all family members participate in the creation of paper decorations. You will need scissors, a pencil, colored paper and a bottle of glue. Surely involve children in work. Occupation develops motor skills. If you take into account the tips and step-by-step instructions, the result will be fantastic.
- Choose the right paper for the garland, because it determines the effectiveness and appearance of the decoration. I use bright sheets. The result is a truly fun and festive item.
- Rings garland is a simple decoration to make. Sheets of multi-colored paper cut into strips of the same size. Using glue, glue the first strip into the ring. After threading the second strip into the ring, glue in the same way. The result will be a decoration that resembles a chain.
- You can make a beautiful garland from a long paper strip. Fold it with an accordion and draw a figure. Make sure that the sides of the figure abut against the folds. It remains to carefully cut the figure without cutting the folds. If you need a long garland, connect several harmonica.
- From this material you can make a complex garland. You need paper that combines several colors. Cut circles or stars of the same diameter. Bending each blank in the middle, glue in pairs. Get a chain of three-dimensional figures.
Video instructions
You can decorate the house inexpensively and beautifully, making the interior as festive as possible. Having mastered the technique of creating garlands, try make christmas toys.
How to make a garland of paper for the New Year
Preparing for the New Year - A responsible and scrupulous process that requires a special approach. It is necessary to purchase food and gifts, clean the apartment, take care of decorations. You can buy them at the store or do it yourself at home. You will need threads, glue, scissors and several sheets of colored paper.
I know several ways to make holiday garlands of paper. I will share the intricacies of this interesting and exciting creative process.
Volume garland
Each family has a lush, multi-colored foil garland. At home, you can create a paper analogue, showing patience.
- From colored paper, cut several circles of the same diameter. Fold each circle two times in a row.
- On the sector that will be obtained after such manipulations with the workpiece, make eight notches. Take turns on each side. Make cuts along the drawn lines.
- Unroll and fasten the circles in pairs, having smeared the bending places on the single strips, which are located at the bottom of the workpiece, with adhesive.
- It remains to pull the workpiece in the middle and get a beautiful ball.With all the remaining circles, do the same, and then use the glue to connect the balls into a chain.
Garland with figures
This Christmas decoration is beautiful and easy to manufacture. It can be hung on a Christmas tree or used for decorationcouch.
- Fold a sheet of colored paper with an accordion and draw a shape. It can be a small animal, fruit or a regular rhombus.
- From the paper, cut the picture along the drawn contours. Do not touch the sides. Spread the garland.
- From a single sheet, a long product will not work. I recommend to do such manipulations with several sheets of various colors and connect with glue.
Chain garland
At the beginning of the article she talked about the manufacture of such a product. Now I offer a more complex option.
- Cut out two circles of paper and connect with a paper jumper. You will get a figure resembling glasses. For the first link of the chain, bend the figure in half. In the same way, make the remaining links.
- Collect the garland by threading the links into one another. No glue needed. Links will be held thanks to jumpers.
Accordion garland
Accordion garland is another version of the New Year decoration. Contrary to its quick and easy manufacture, it helps make it truly new year interior.
- From colored paper, cut out rectangles of the same size and fold them with an accordion. The width of the strips is two centimeters.
- Bend the accordion in half and glue the inner ends. The result is a beautiful fan.
- After making a certain number of blanks, glue together. The individual elements should be placed upside down in relation to each other.
I hope that the manufacturing techniques that I shared are understandable and will help to save on the purchase of factory jewelry.
How to make a garland of paper for a birthday
Everyone wants to celebrate a birthday in a cozy and comfortable atmosphere. This holiday requires appropriate surroundings, and a beautiful garland fits perfectly. If you never had to engage in creative activity, do not be discouraged, everything will turn out. Perhaps the lesson will like it a lot and become a hobby.
I propose to make a garland of flags. It will take colored paper, one Whatman paper, scissors and glue. Do not use cardboard, it is heavy and the decoration will sag. The lack of colored paper is not a cause for frustration. Replace it with wrapping, the remnants of wallpaper or an old world map. If you are friends with a hook and a needle, make a garland of textile.
As for the mounting of flags, it can be different. I use twine. I bend the flag in the middle, skip the rope and glue it. And the use of a stapler simplifies the procedure.
An original garland of flags will become an adornment not only of a birthday, but wedding anniversaries. Choose the right color scheme that matches the theme of the holiday event.
- Make triangular shapes. Fold the square piece of paper diagonally and gently cut it.
- The next step involves the manufacture of letters, from which we will subsequently create a thematic inscription. To ensure that the result is beautiful and accurate, maintain the size correctly.
- The garland will become original if the letters are not glued on the flags, but on the substrate. For this purpose, you need two sheets of paper 30 by 7 centimeters. Fold each sheet into an accordion and glue the ends together.
- Strengthen each flag with a paper, make a hole and thread the twine. At the end of the procedure, distribute the flags evenly.
- It remains to stick the circles, attach the letters and fix with adhesive.
Such a product will be a wonderful decoration of a festive interior. A similar option can be made for another holiday, for example, March 8. In this case, use paper flowers instead of flags.
The history of festive garlands and decorations
In Russia there are many holidays that bring people together and do not leave them indifferent. In preparation for the big festive event, for example, for the New Year, people decorate houses and courtyards with toys and garlands.
Residents of our state have long lit New Year trees. In 1700, Peter the Great in Europe adopted this tradition. According to the royal decree, for the New Year's illumination, fireworks and wax candles were mandatory.
For many years, candles remained an integral element of the New Year decoration along with New Year's toys and Christmas tree decorations. Despite the fact that such decoration often led to fires, citizens neglected safety for the sake of a festive atmosphere.
Ralph Morris - a telephone operator from England, decided to use electric lamps instead of candles. In 1895, through the efforts of the Americans, the first garland of light bulbs appeared.
In Soviet times, garlands were sold, equipped with small bulbs in the form of rockets, flashlights and figures. Modern illumination is a non-separable electrical product, in the branches of the cable of which miniature lamps are built. They are equipped with an electronic control unit that provides lighting effects.
Such garlands are also sold that reproduce a programmed melody thanks to the built-in musical synthesizer.
So the article came to a logical conclusion. I gave step-by-step instructions for making garlands of paper with my own hands, useful tips and a bit of history. In conclusion, I wish you success in your creative endeavors. See you!


